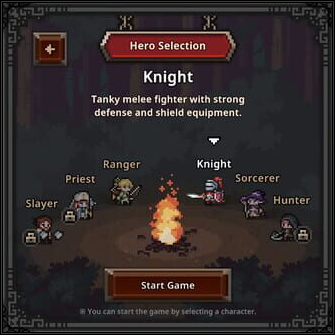
Starting out you have a choice of 1 to 6 classes and this will be the first screen you see. Regardless of whether you bought the character DLCs or not, these 3 will be locked until you unlock them through the in-game currency which you can get very easily. Don't forget that the Priest DLC is free and so far seems to be the most useful and essential class for any formation/build.
Choosing Your First Class
Which one you pick for your first is up to personal preference but the most advised ones are either Knight or the Ranger for a "faster" or more offensive approach due to her high attack speed. Both serve as solid picks for further into game and fulfill their respective roles as Tank and DPS quite nicely.
Formation & Class Switching
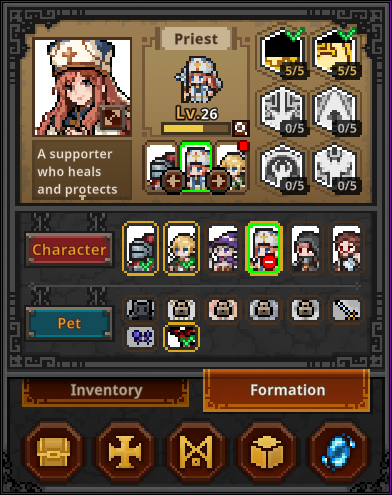
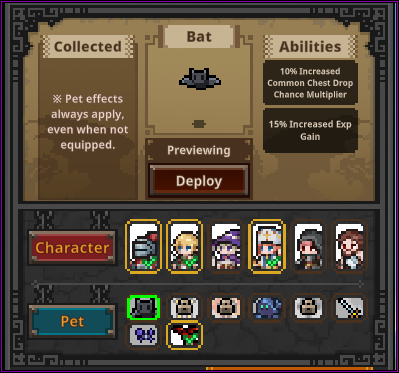
Should you feel that you made a mistake on your first choice or at any time want to switch out classes and/or formation, this can be done through the "Formation" tab and screen shown on the right hand side. Remember the locked DLC classes from the Hero Selection screen, this is where they can be unlocked for a low sum of 500 coins each as well.
Simply click on the desired hero you wish to switch out or in click on deploy and select the position you wish to place them in. Should you wish to change their order, this can be done through hitting the arrow buttons to the left or right of the character portrait as shown on the Priest in the middle in the preview; no need to deploy/redeploy as this comes with a 60 second cooldown.
With this manner you can freely switch your classes or formation at any time and possibly carry lower levels for some 'power-leveling' through increasingly higher stages. All of course whilst bearing the risk of possible stage failure if the rest of the formation isn't strong enough to survive or sweep the floor.
Important to note about 'power-leveling' is that characters get the most optimal experience within a certain range of stages respective to their level. So 1 or 2 high/fast clearers can gradually increase the stage to keep up with optimal gain for the other(s) to catch up.
This also works if one of your party members has fallen and is on cooldown for resurrection; you can switch out a temporary other member to fill in the void, take hits, deal damage and prevent stage failure or sometimes even get that little bit of extra survival time to clear a new stage you otherwise couldn't.
Needless to say, any red dots on your heroes as shown in the picture means they have skill points or slots to assign, which can be done in their respective status window.
Pets can also be equipped on the very same formation screen. Important note here is that pets serve purely for cosmetic appeal as their passive effects will always apply whether they are deployed or not.
Pets Are Cosmetic Only
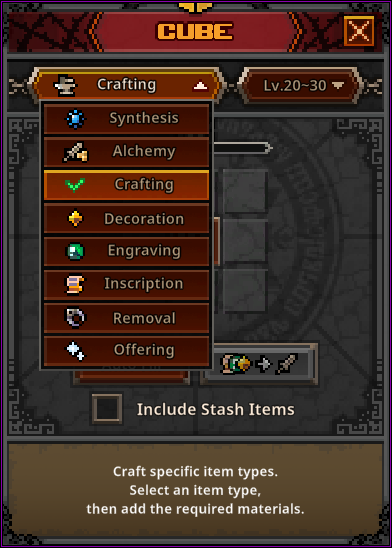
The Hero-dric Cube
Behold the all-mighty Hero-dric cube that is totally not inspired by a certain cube from a different game. Maybe if we put in a leg and a tome in there, we'll unlock a secret portal to a mooo-tiful dimension.
Jokes aside, this is where a lot of the itemization action happens and a lot of questions tend to be asked. I will not cover basic inventory management as I think that is self-explanatory with just sorting your items and arranging stashes is really up to personal preference. So I'll just go over each of the cube features in order as they are listed in the picture.
Synthesis
Synthesis Basics
Fill up the cube with 9 items of the same rarity to create a random item of the a higher rarity. Thanks to Kei and KareAiza for the heads-up that it's not necessarily the next rarity but can jump and skip ahead if you're lucky. Other important note here is that level has little to no bearing on the resulting item. The level of the resulting item is purely defined by the level range in the second drop down window on the top right. Meaning you can fill up the cube with lower leveled gear and still get a result between the designated range. You can put in even lower level gear than the minimum of the range but only up to a 5 level difference (so you can use level 15 gear to synthesize a 20-40 piece). You can always put higher gear to make lower gear but the game will prompt you if you're sure you want to do that.
Whether it's worth to do this is in the beginning is ill-advised other than to upgrade your cube level to unlock the other features. As gold income early on is essential to upgrade rune to unlock the other formation slot(s) and make farming items easier and faster. And the next cube option will exactly allow you to do that.
Later on though when item drops become more excessive and gold is not as impactful as in the beginning, one could consider synthesizing to try and gear up your heroes with shinier armor and weapons.
For those interested in the exact chances and rates I have compiled a temporary overview with thanks to the help of KareAiza & Fewie, until later rarities get their stats revealed of as well.

Alchemy
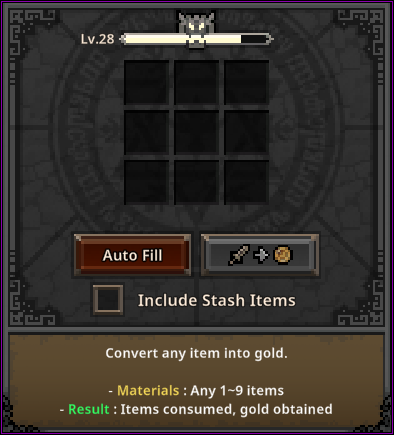
The feature most people will want to seek out and ask about as this is essentially how you sell your excess/unwanted items by converting them into gold.
You can put up any amount of items — be they gear or materials — to alchemize into gold. You can generally use the auto-fill to quickly alchemize items from your current inventory. The important thing to note here is that there's no filter here and you have to look carefully that it doesn't add anything you don't want to convert. You can prevent this by stashing your items or locking items by using the Alt + Left Click shortcut.
You can check the option to include stash items though for aforementioned reason this may not be ideal if you haven't locked things down as it does auto fill items from any tab. But still helpful if you want to quickly clear out/reset your stash.
You can see how much gold any item will convert to by hovering over it and checking their value in the bottom left.
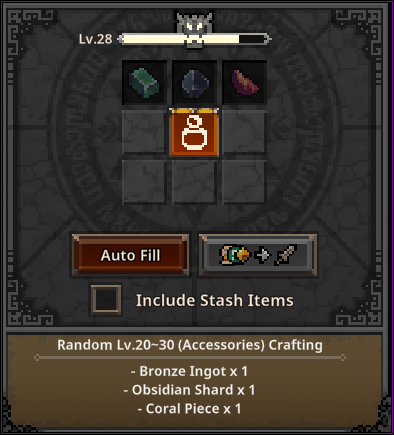
Crafting
Clicking on the center of the cube/icon will bring up a selection of the item types you can craft and depending on the category as well as the level range in the top right will decide what materials you need to craft said item.
The item crafted is entirely random when it comes to rarity and class but will always be within the designated level range. Personally I have experienced quite a good amount of legendary and immortal crafts and one Arcana but I would not dare to estimate the specific chances on this.
This will also be your gateway to acquiring accessories as I have yet to see any of these drop from regular chests in Act 1 to Act 3 on Normal.
I would say it's safe to craft anything whenever you have the materials for it as higher ranges will require higher and different materials anyway. And if you can snatch a nice legendary or immortal that way to gear up your crew and ease farming/progression, that's always nice.
Decorations, Engravings & Inscriptions
By now you would already have seen that starting from blue rarity, gear pieces will have decoration slots on them. These can of course be filled with appropriate decoration material using this particular cube feature. Simply slot it in the gear piece, the material and click to confirm (gear does not have to be unequipped for this). Note here is to check your decoration material for what traits it can add depending on the item type as you wouldn't want "Fire DMG%" on a class item that doesn't deal any fire damage.
If you happen to have come across any Immortal rarity items, you will notice gear will carry engraving slots. Same rules apply here as they do for decoration but with different materials and different traits for each item category.
Should you be lucky enough to already have found an Arcana rarity item, you will see the third and last Inscription slot. By now I hope it's needless to explain what this means and pertains to in regards to the aforementioned two slots.
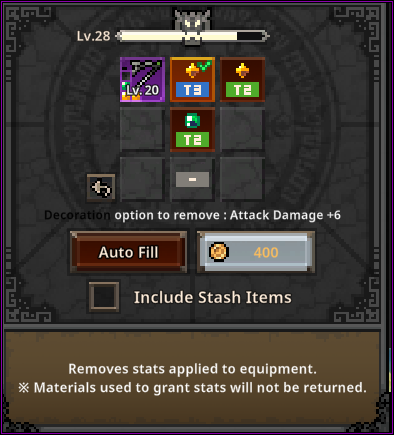
Removal
Say no more, meet the "Removal" feature.
As shown in the picture, simply slot in the respective item and select which slot you want to remove. Depending on what is slotted will decide the removal cost but usually the price is rather trivial. Do note that unlike slotting something into gear, removal requires the gear piece to be unequipped first.
The other important thing to keep in mind here is that removal will destroy the slotted material and not extract it for another use.
Offering
Last and probably in this case least is the offering feature, which thanks to Руслан's luck and daring sacrifice has been unraveled a little bit more.
The description in itself states: "Offer commemorative coins to obtain random items." And as such you can imagine it seems to work akin to being a glorified lootbox. And judging from the market listings they also come in multiple rarities, and the Legendary one that was found by our fellow player Руслан was from a drop of the boss in Act 2-10.
Still more exact data is welcome and needed to state specifics but I would imagine they come in different rarity tiers for a reason... and that about wraps up this section about the Hero-dric cube.
Steam Trade Ship & Market
So you finally found a rare item you wish to sell for more than just monopoly money. Be sure to check if it's really of any worth to do so as generally only items of Immortal+ rarity tend to be. Legendary items may sell for a few cents if one cares enough for it but otherwise I'd advise checking the marketplace to get a better grasp on it.
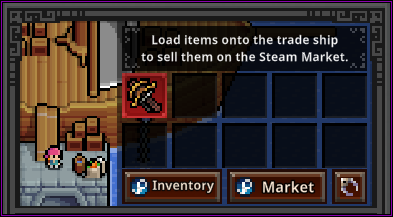
Loading & Listing Items
As you see on the right hand side, there is an icon bearing the symbol of a ship at the top left of your main TBH window. Hovering over it reveals it's the "SteamTradeShip" — commanded by no other than GabeN himself "probably". Clicking on it will bring you to the next window.
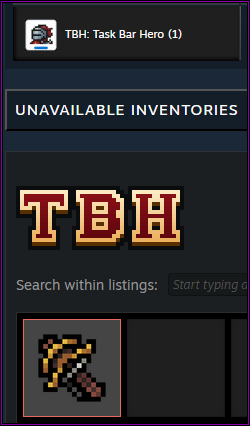
Loading the ship. Drag any items you want to put up for trade from your inventory below this window to the ship (this may take a second or three as it loads it onto your Steam Inventory). After that simply go to your Steam Inventory, manually or by clicking the Inventory button with the Steam logo in the picture which will redirect you to the same place. From your Steam inventory, look in the right tab of Task Bar Hero, find your item and click on "Sell" to set a price after which the listing will need your official confirmation through the Steam App/Guard. If you have properly set this up before, there should be no trade delay. Clicking on the "Market" button on the Steam Trade Ship will just direct you to the Marketplace where you can view what is already listed there.
Adjusting & Retrieving Listings
Any items listed for sale will no longer appear in-game until you de-list them and have them present in your Steam Inventory again.
You have come to the point where you realized your item is not selling for its set price and wish to adjust it. Maybe it wasn't even worth the listing and you wish to retrieve it? Either way, easiest way to find your listed item is through going to Community → Market on Steam, find your active listings, and cancel the listing from there. The item will reappear in your Steam Inventory and you can click "Sell" again to adjust the price.
If you do however wish to retrieve your item back into the game or claim any other bought items, make sure they are present in your Steam Inventory and go in-game. But now instead of going to the Steam Trade Ship, go to your mailbox by clicking the mail icon in your top right main TBH window.
Your mailbox will be on a 10 second cooldown every time you enter or refresh it. Simply wait out the timer and hit the refresh button. And hurrah — any bought or delisted items will pop up here for you to claim/reclaim.
If you haven't listed an item yet it will remain on the ship. The ship only carries it away out of the game once listed after which it can only be delisted and reclaimed through the mailbox.
Gear pieces have to be stripped of any slotted decorations/engravings/inscriptions and only be sold in their natural variant and base traits.
Bought items can't be instantly re-sold which comes from Steam's own rulings to discourage quick resale tactics. But if you happen to find something for dirt cheap and find it's still worth more after the 7 day grace period, then good on you.
Pets
I have mentioned it very briefly in the first section on the Formation window, about pets. Because their effects are always active no matter if they are deployed or not, it could be a good idea to unlock them sooner than later as the available ones so far all require the slaying of a certain amount of specific monsters. These are some of the stages where you can find them:
- Bat — found around Act 1-8
- Giant Fly — found around Act 2-4 & 2-5
- Fire Spirit — found around Act 2-8 & 2-9
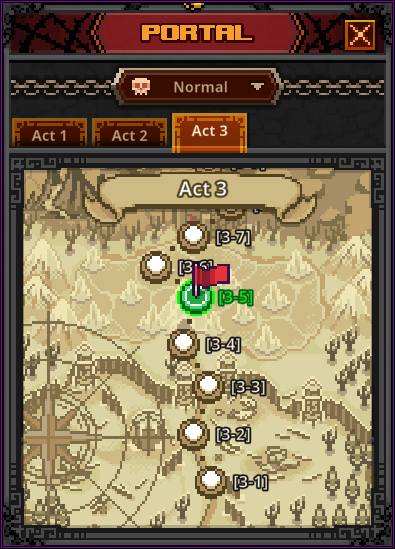
- Blue Golem — found around Act 3-6
- Ghost — found around Act 3-4 & 3-5
There have been mentions that the spawn amount varies per difficulty tier (exact numbers might follow sometime) so one could consider if the rate feels too slow in Normal to try farming it later on in Nightmare+ instead depending on how badly you want the passive effect. If nothing else, the other consideration is to focus on progression and growth first and later come back to clear them faster, speeding up the process.
Remember that at any time you can fast travel/select to any of previously completed stages by clicking the shiny blue portal icon on the bottom right of your main TBH window.
Farming Efficiency
Suggested by Fardeki but I do think it's a notable tip is to find out what works best for yourself when it comes to farming stages. Just because you can complete the highest stage that is available to you, does not necessarily mean it's going to be the most fruitful for you in terms of loot. Sometimes it pays out better to visit a previous stage for its faster and/or easier clear times.
Some people swear by a more offensive setup such as Priest + Ranger + Sorcerer for faster clearing which I can understand because the Knight's performance to provide more sustain and push stages does come at a DPS loss compared to a more AoE or damage-oriented class. And if your Priest singlehandedly is enough to sustain herself in a certain stage then this setup might work out best for farming sake.
That is as far as I will cover it though as formations are still subject to personal experience and data collecting. But I do hope this might incentivize people to try and utilize the other 2 DLC classes and raise them to see if they can uphold a rightful place for certain setups or builds.
Runes and the Rune Tree
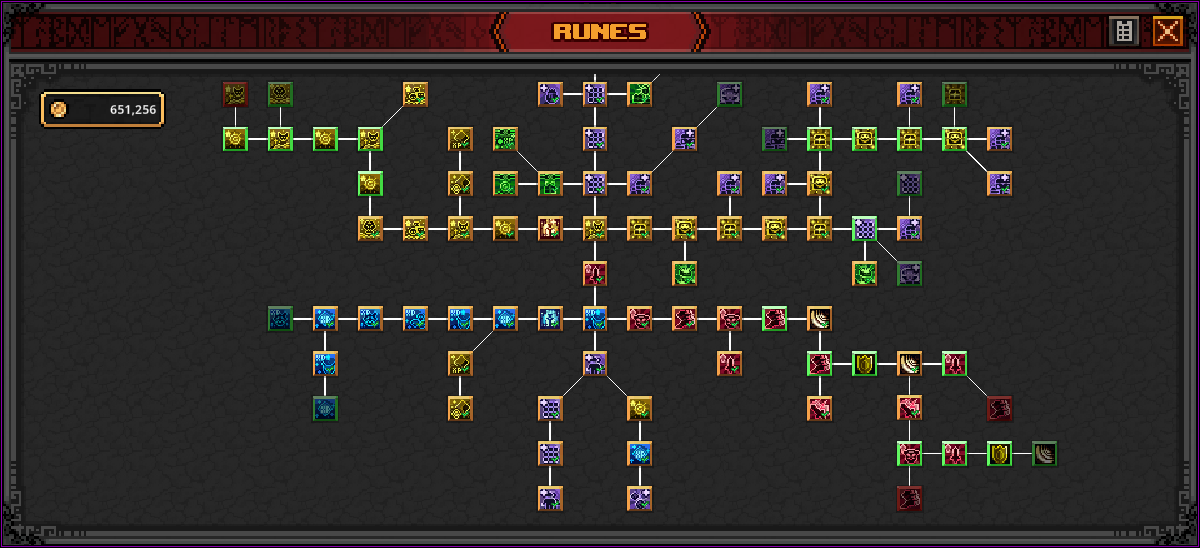
Let's have a look at the Rune Tree. For starting out your main draw would be to get a full formation going to make farming and pushing that much easier, which means your focus will be directly down to the south from your first Rune.
I have not marked them on the picture but you can see there are two purple Runes that resemble a stickman silhouette with a green checkmark on it. These are your two Runes that will unlock the remainder 2 slots for your Formation. Bear in mind the pricing on the last rune is going to be 150,000 gold which for starters can be a bit daunting to attain perhaps but getting it out of way sooner than later will make up for it in the long run.
On the right side across from the rune that unlocks your third Formation slot is the rune that unlocks your second active skill slot costing 50,000 gold. I would put this Rune on a bit of a lesser priority because even though another skill slot could also serve to make farming/pushing more efficient it does obviously require more skill point investment which you may not have so easily to spare in the early levels if you want to raise the passive talents first. And also because you may not want both Tier 1 active skills and instead go for the higher tiered ones later on.
To see your total bonuses from your runes, you can click on the little grey "list" icon in the top right to get a full list and overview.
Wrapping this section up, I will briefly explain where the focus of upgrades lies in each of direction(s) in the Rune Tree, starting with:
- North-West: Gold from bosses, kills, and anything that increases gold gain, plus minor runes for Cube Alchemy gold and XP.
- Far North: Inventory slots, stash pages and auto open chests (300s cooldown for common chests, 600s for blue/boss chests).
- North-East: Chest drop chances and capacity — more chests before overflowing, more frequent drops.
- South-East: All Hero Attack, Armor and Speed — boost overall DPS and resilience.
- South-West: Maximize experience gain for faster hero progression.
Further zones have increasingly higher prices (1-3 million to 50 million for the last Stash tab). Personally I went with a bit of mixed/overall spread because the further you go into a direction the higher and higher prices will evidently become.
Are the DLC Characters Worth It?
The general consensus as it is seems to be that for the early game they pale in comparison to the standard available classes, with exception for the Priest who is a borderline essential unit for any formation. The Priest however is a free DLC so be sure to add her to your game.
People are still out experimenting with both the Slayer and the Hunter and have found builds that work for them that revolve around as an alternate lifesteal tank or an Active Skill focused AoE class. Whether that puts them in line with the others remains to be seen.
Right now I personally consider them as supporter packs with an alternative content, though I really like Hunter for her aesthetic. If you do however want to just support the game but are strapped for cash and you're uncertain about the classes' benefit, I would suggest getting the actual support pack instead. Because the pets and their passive skills will mean more universally than the additional two classes you may not utilize.
Should You Sell the Red Soulstones?
If you're still strapped for gold on you could definitely consider doing this as 9720 gold may seem like a lot for starting out; which you could maybe use to unlock your last formation slot(s) faster or other runes. Up to personal preference but I will advise holding onto one or at least beating Act 1-10 first because they will start to drop more frequently and randomly from any chest in Act 2 and above.
That said, regular higher leveled gear will quickly start alchemizing for more than the soulstones so personally I don't recommend doing that unless for aforementioned reason(s).
Why Won't My Chests Open?
These issues, overall slowdown of opening chests, cube actions and related errors are due to the server(s) being overloaded by its current huge and rising player count. All actions would otherwise normally be quick, smooth and without failure.
What this peak of player count means I will leave to personal interpretation to prevent any possible drama. I do feel sorry for the players who may have lost items or currency due to this but some of the lost items that were not consumed may still be able to be retrieved through your mailbox.
My advise here however for the time being, is to ease up on any action(s) you may not want to risk involving higher valued items until the dust settles.
Additional Tips & Tricks
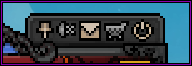
Perhaps inconveniently hidden or maybe some may have noticed it, there is an 'auto-retry on stage failure' option that can be toggled on and off on the bottom right side besides the menu button. As the name implies: if it's toggled on (blue) it will auto retry the stage on failure. If it's turned off (grey) it will auto reduce you to the previous stage. This will continue if you happen to fail that one too by chance until it finds a stage where your formation is able to clear it.
Auto-Retry Toggle
Chest Types
Chests and where they drop. Common (White) chests are found all around at any given time. Stage Boss (Blue) chests are dropped by as you may have guessed, Stage Bosses — these are also chance-based and can be increased with runes. And lastly Act Boss (Red) chests are guaranteed drops from each of the Act's final bosses which consumes one of your available soulstones respective to their difficulty tier (Normal, Nightmare, Hell & Torment).
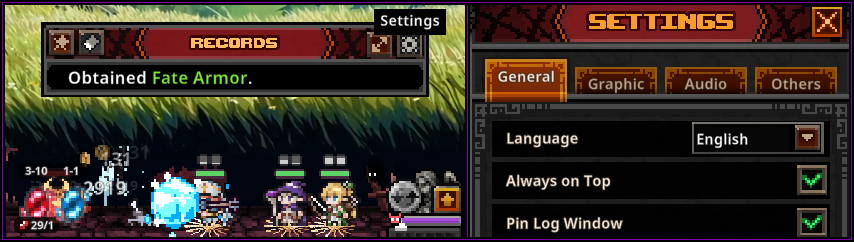
Some players have mentioned adjusting their log windows and not being able to get it to pop back up again. By hovering over a new/recent message above your playing field it pops up a window where you can adjust the settings on what kind of message you want to be shown here if any at all. You can also reset, pin or expand this with the other three buttons. However should you have adjusted it to where no messages are displayed and wish to revert it, you can go to the settings on your main TBH window and check "Pin Log Window" which should pop the entire window back up for you to re-adjust.
Last Updated: 9th of June 2026 | View on Steam | For a deep dive into recommended progression from start to late-endgame, see Yampiri's Guide.